记录工作中的点点滴滴

从零开始nodejs系列之案例一:HTTP小爬虫

一.前言

漫漫长路,从脚下开始;
那么就从一个一个案例开始吧,在这个叫做blog的地方做为笔记记录下来。。。

二.案例一:HTTP小爬虫

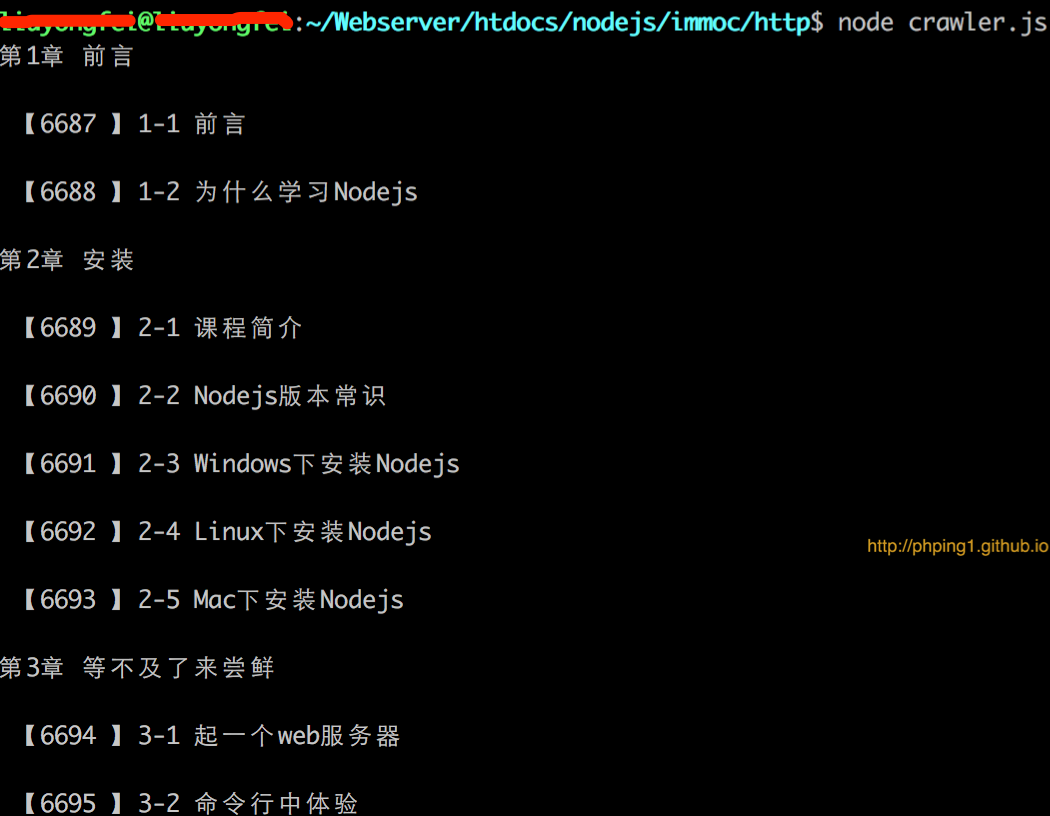
1. 从零开始nodejs系列之案例一:HTTP小爬虫

本案例用来抓取慕课网的nodejs课程列表,如下:
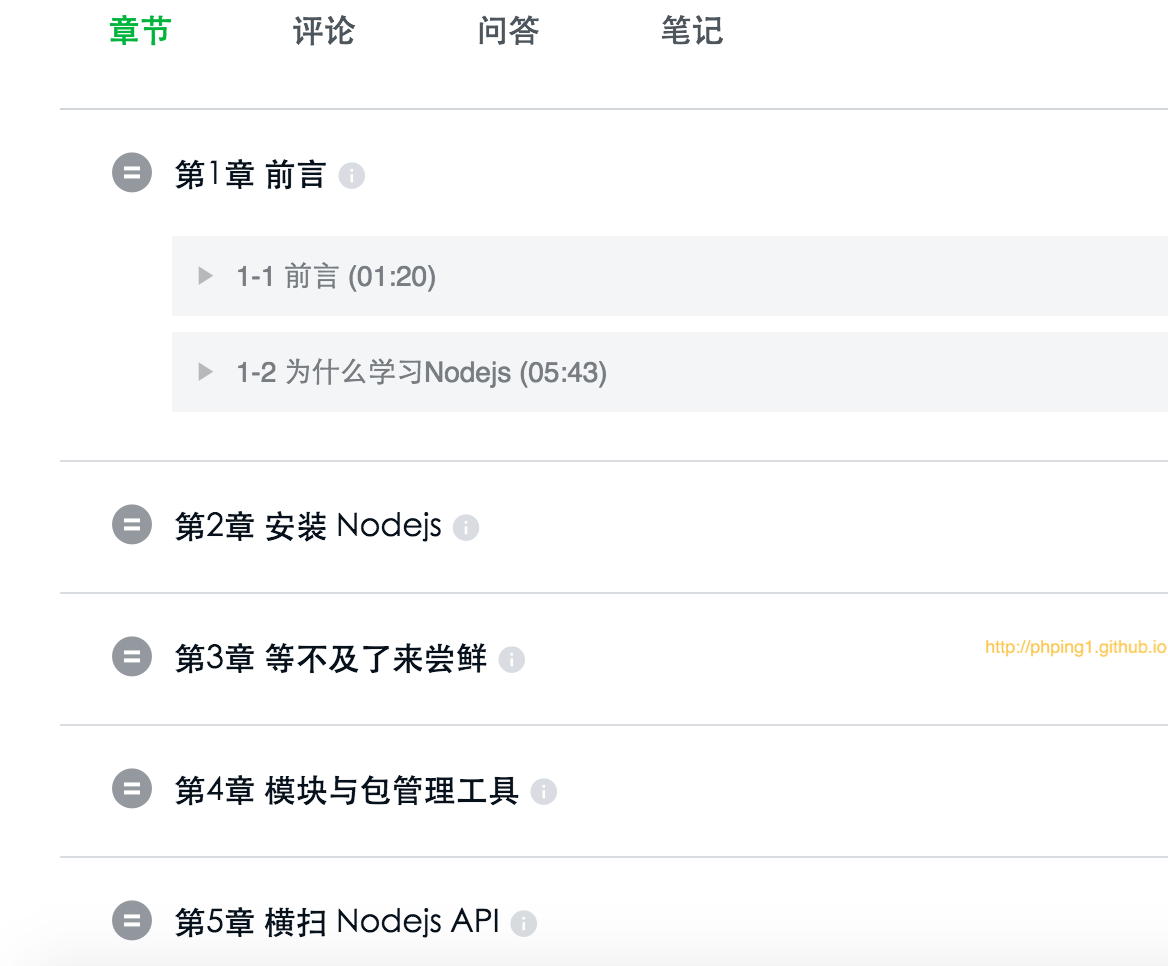
QQ20160925-0@2x.png

2.爬虫抓取结果如下:

QQ20160925-1@2x.png
注意:篇幅所限,这里我就截取了前三章的课程列表。

三.HTTP模块

在讲HTTP小爬虫之前,先来大概介绍一下HTTP模块。
关于HTTP的api,点这里,我这里就不一一列出来了。让我们从一个简单的例子开始。

1.需求

目的:建立一个lesson项目,通过在其中编写代码,当在浏览器中访问:http:://localhost:3000时,输出:Hello World
代码如下:

1
2
3
4
5
6
7
8
9
10
11
12
13
14
const http = require('http');
const hostname = '127.0.0.1';
const port = 3000;
const server = http.createServer((req, res) => {
res.statusCode = 200;
res.setHeader('Content-Type', 'text/plain');
res.end('Hello World\n');
});
server.listen(port, hostname, () => {
console.log(`Server running at http://${hostname}:${port}/`);
});

在命令行中执行:

1
$ node server.js

浏览器访问:

1
http://localhost:3000/

即可看到输出结果:

1
$ Hello World

2.代码分析:

  1. 通过”require”引入NodeJS自带的”http”模块,并且把它赋值给http变量;
  2. “requestListener”这个回调函数,它提供了两个参数(request,response),我在代码里分别简写为req,res。每次收到一个请求时触发。

    1
    http.createServer([requestListener])

    返回一个新的web服务器对象。参数 requestListener 是一个函数,它将会自动加入到 ‘request’ 事件的监听队列.

  3. statusCode是一个三位的HTTP状态码, 例如:”404” 。

    1
    response.statusCode = 404;

    当使用默认headers时(没有显式地调用 response.writeHead() 来修改headers),这个属性决定headers更新时被传回客户端的HTTP状态码。

  4. setHeader

    1
    response.setHeader(name, value)

    为默认或者已存在的头设置一条单独的头内容。如果这个头已经存在于 将被送出的头中,将会覆盖原来的内容。如果我想设置更多的头, 就使用一个相同名字的字符串数组

  5. server.listen(port, [hostname], [backlog], [callback])

    开始在指定的主机名和端口接收连接。如果省略主机名,服务器会接收指向任意IPv4地址的链接(INADDR_ANY)。

四.cheerio模块

抓取到网页之后如何获取到想要的数据呢?然后就发现了cheerio,用来解析html非常方便,就像在浏览器中使用jquery一样;
为服务器特别定制的,快速、灵活、实施的jQuery核心实现。

github项目地址点这里

安装

1
npm install cheerio

API

我们再来看cheerio的API举的例子

Markup example we’ll be using:

1
2
3
4
5
<ul id="fruits">
<li class="apple">Apple</li>
<li class="orange">Orange</li>
<li class="pear">Pear</li>
</ul>

Loading

First you need to load in the HTML. This step in jQuery is implicit, since jQuery operates on the one, baked-in DOM. With Cheerio, we need to pass in the HTML document.
This is the preferred method:

1
2
var cheerio = require('cheerio'),
$ = cheerio.load('<ul id="fruits">...</ul>');

Selectors

Cheerio’s selector implementation is nearly identical to jQuery’s, so the API is very similar.

1
2
3
4
5
6
7
8
$('.apple', '#fruits').text()
//=> Apple
$('ul .pear').attr('class')
//=> pear
$('li[class=orange]').html()
//=> Orange

Attributes

Methods for getting and modifying attributes.

.attr( name, value )

Method for getting and setting attributes. Gets the attribute value for only the first element in the matched set. If you set an attribute’s value to null, you remove that attribute. You may also pass a map and function like jQuery.

1
2
3
4
5
$('ul').attr('id')
//=> fruits
$('.apple').attr('id', 'favorite').html()
//=> <li class="apple" id="favorite">Apple</li>

再看一个小demo

1
2
3
4
5
var cheerio = require('cheerio')
$ = cheerio.load('<h2 class="title">Hello world</h2>')
$('h2.title').text('Hello there!')
$('h2').addClass('welcome')
console.log($.html());

输出:

1
<h2 class="title welcome">Hello there!</h2>

等等,我就不再一一贴出来了,大家看一些这些语法,是不是就跟jquery的语法差不多呢。。。

HTTP模块和cheerio模块已经做了简单的介绍,详细的使用大家可以翻阅对应的API。
好,准备工作也做得差不多了,让我们步入正题,开始来做HTTP爬虫吧。


HTTP爬虫所需模块

  • HTTP模块: 既然是HTTP小爬虫,肯定需要HTTP模块.
  • cheerio模块: 抓取到网页之后如何获取到想要的数据,这个时候就需要cheerio,用来解析html非常方便,就像在浏览器中使用jquery一样。

==开始摞码:==

一.代码区1

加载所需模块

1
2
3
var http = require('http')
var cheerio = require('cheerio')
var url = 'http://www.imooc.com/learn/348';

代码解释

  1. 加载http模块;
  2. 加载cheerio模块;
  3. 指定要抓取的地址;

二.代码区2

1
2
3
4
5
6
7
8
9
10
11
12
http.get(url,function(res) {
var html = '';
res.on('data',function(data) {
html += data
})
res.on('end',function() {
var courseData = filterChapters(html)
printCourseInfo(courseData)
})
}).on('error',function() {
console.log('出错了哦')
})

代码解释

http.get(options, callback)

1
2
因为大部分的请求是没有报文体的GET请求,所以Node提供了这种便捷的方法。
该方法与http.request()的唯一区别是它设置的是GET方法并自动调用req.end()。

http.request的用例如下:

1
2
3
4
5
6
7
8
9
10
11
12
// make a request
var options = {
port: 1337,
hostname: '127.0.0.1',
headers: {
'Connection': 'Upgrade',
'Upgrade': 'websocket'
}
};
var req = http.request(options);
req.end();

response.end

结束响应,告诉客户端所有消息已经发送。当所有要返回的内容发送完毕时,该函数必须被调用一次。
如何不调用该函数,客户端将永远处于等待状态。

filterChapters函数

filterChapters函数为封装好的过滤html的函数

1
2
3
4
5
6
7
8
9
10
11
12
13
14
15
16
17
18
19
20
21
22
23
24
25
26
27
28
29
30
31
32
33
34
35
function filterChapters(html) {
var $ = cheerio.load(html)
var charpters = $('.chapter')
var courseData = []
charpters.each(function(item) {
var chapter = $(this)
var chapterTmpTitle = chapter.find('strong').clone()
chapterTmpTitle.find('div').remove()
// var chapterTitle = chapter.find('strong').text()
var chapterTitle = chapterTmpTitle.text().match(/\S+\s\S+/)
var videos = chapter.find('.video').children('li')
var chapterData = {
chapterTitle: chapterTitle,
videos: []
}
videos.each(function(item) {
var video = $(this).find('.J-media-item')
var videoTmpTitle = video.clone()
videoTmpTitle.find('button').remove()
var videoTitle = videoTmpTitle.text().match(/[0-9]+-[0-9]+\s\S*\s?\S*/)
// console.log(chapterTitle)
// var videoTitle = video.text()
var id = video.attr('href').split('video/')[1]
chapterData.videos.push({
title : videoTitle,
id: id
})
})
courseData.push(chapterData)
})
return courseData
}

printCourseInfo函数

printCourseInfo函数用来打印课程信息的函数

1
2
3
4
5
6
7
8
9
function printCourseInfo(courseData) {
courseData.forEach(function(item) {
var chapterTitle = item.chapterTitle
console.log(chapterTitle + '\n')
item.videos.forEach(function(video) {
console.log(' 【' + video.id + ' 】' + video.title + '\n')
})
})
}

好了,主要代码大概就是这些。